This post contains affiliate links. Full disclosure at the bottom.
Short version: This Systeme.io funnel tutorial walks through the free opt-in funnel we rebuilt from scratch on November 9: a sign-up page, a thank-you page, and a test contact landing in the list. It took about seven minutes from "Create funnel" to a new contact, screenshots included. Watch for three things: the mobile view has its own headline and button, the double opt-in box is off by default, and the welcome email won't send until you've verified a sender on your own domain.
Try Systeme.io free (no card needed) →
An opt-in funnel is the simplest thing to build in Systeme.io. Someone types an email address to get your freebie, lands on a thank-you page, and shows up in your contact list. Ours offers a Free Teacher Productivity Checklist, so that's the example you'll see in every screenshot.
We first built this funnel on October 25 and wrote about what we learned in our Systeme.io review. For this tutorial, we started a second, separate funnel on the free plan last night so every step and button label would be current. Here is exactly what we clicked.
What you need before you start
You need a free Systeme.io account, which doesn't ask for a credit card, and the name of your freebie. That's enough to get a working sign-up page. If you also want an automatic welcome email, you'll need an email address on a domain you own, such as hello@yoursite.com. A Gmail address won't work as the sender. We'll come back to that in Step 6.
Step 1: Create the funnel and choose "Build an audience"
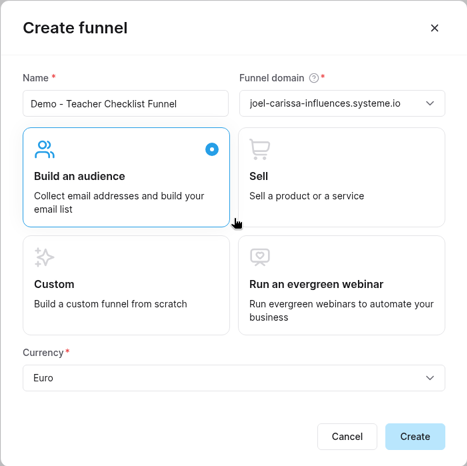
From the top menu, go to Sites, then Funnels, and click "Create." A "Create funnel" window opens. Type a name (ours was "Demo - Teacher Checklist Funnel"), leave the funnel domain on your free systeme.io subdomain, and pick the goal card "Build an audience."
That goal matters more than it looks. It builds both pages for you: an "Opt-in page" and a "Thank You / Download Page," already linked in the right order. The other goals are "Sell," "Custom," and "Run an evergreen webinar."
The last field, Currency, defaulted to Euro for us. It doesn't affect a free sign-up funnel, but change it now if you plan to sell from this funnel later. Then click "Create."
Step 2: Pick an opt-in template
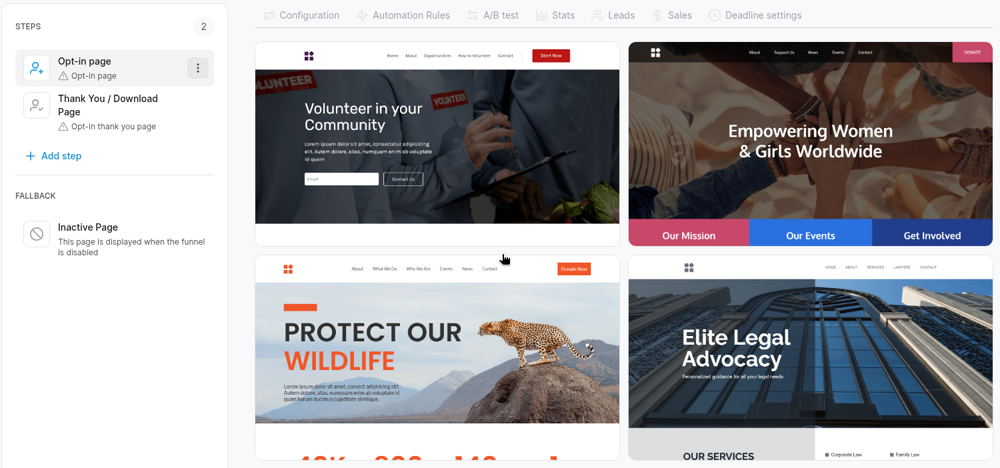
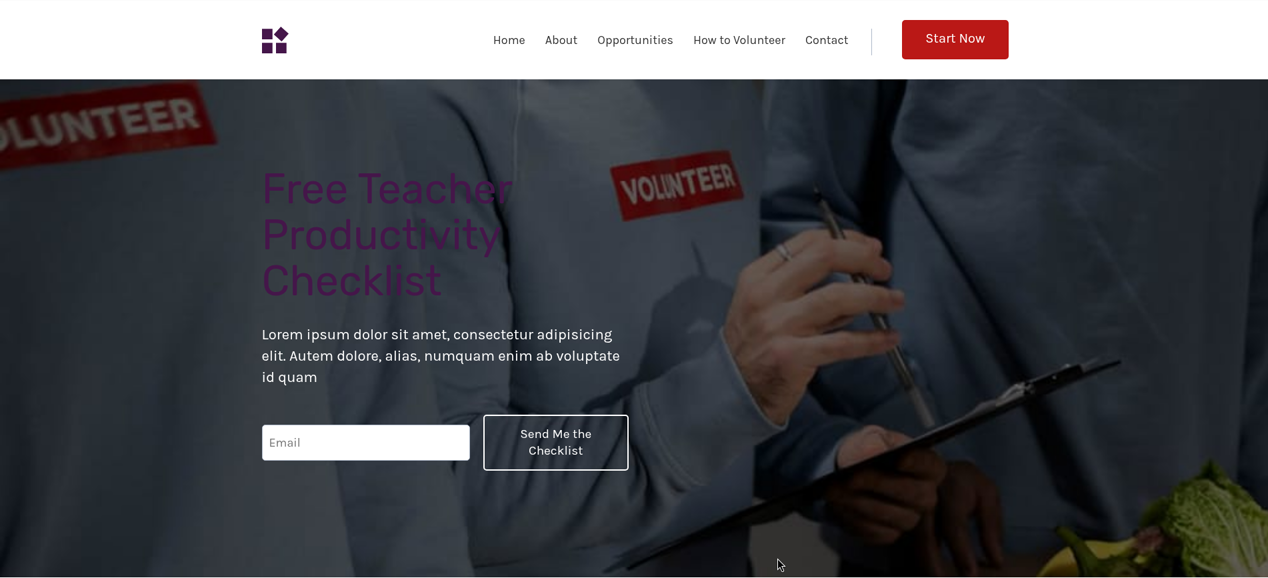
Your new funnel opens on its steps list, with the opt-in page selected and a grid of free templates beside it. Hover over a card and click "Use template." We used the first one, "Volunteer in your Community," because its layout is plain: a headline, one line of text, an email box and a button.
Every template comes with stock photos, placeholder text and menu links you'll replace anyway, so choose by layout, not by picture. Then click "Edit page."
Step 3: Change the headline and button on desktop and on mobile
In the editor, double-click the headline, select all of the text, and type your own. We used "Free Teacher Productivity Checklist." Click the button, find "Button text" in the settings panel on the left, and change it. Ours became "Send Me the Checklist." Click "Save."
Here's the step most people miss. Click "Mobile view" in the top bar. Systeme.io keeps separate desktop and mobile versions of the headline and button, so our phone preview still said "Volunteer in your Community" and "Contact Us." You have to edit both again in mobile view and save a second time. If you skip this, anyone who signs up on a phone sees the template's words instead of yours.
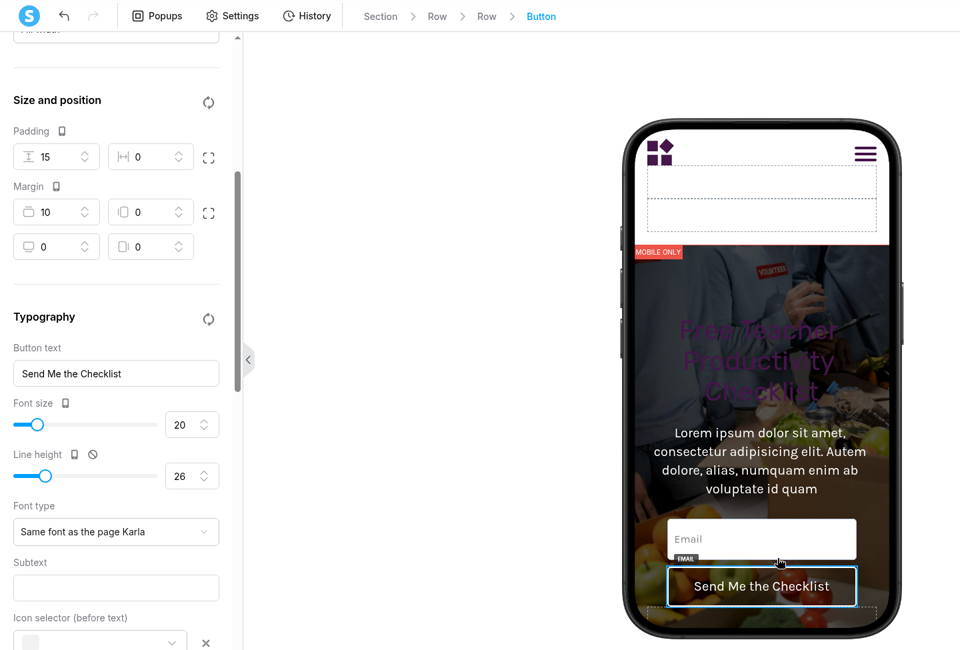
While you're in there, look hard at the headline color. The template's dark purple headline is hard to read against the dark photo, both on desktop and on a phone. In our October build we switched to a solid navy background with white text, which fixed the contrast. This time we left the purple so you could see the problem in the screenshots.
Step 4: Check the button settings
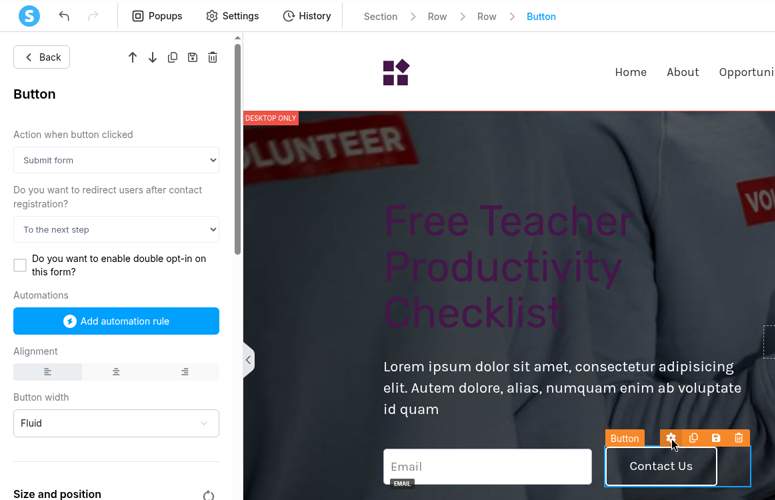
Back in desktop view, click the button once and read the settings panel before you leave the editor. Three settings matter:
"Action when button clicked" should say "Submit form." That's what sends the email address into Systeme.io.
"Do you want to redirect users after contact registration?" should say "To the next step," which is your thank-you page. It was already set that way for us.
"Do you want to enable double opt-in on this form?" is an unchecked box. With it unchecked, people join your list as soon as they submit. If you check it, they have to confirm by email first.
We left double opt-in off for this test. It's a judgment call: double opt-in keeps typos and fake addresses off your list, but some people never click the confirmation link.
Step 5: Set up the thank-you page
Exit the editor and click "Thank You / Download Page" in the steps list. If you skip it, the step stays blank. In our October build, new subscribers saw nothing but a line saying no thank-you page had been defined. Our thank-you page fix covers that problem in detail.
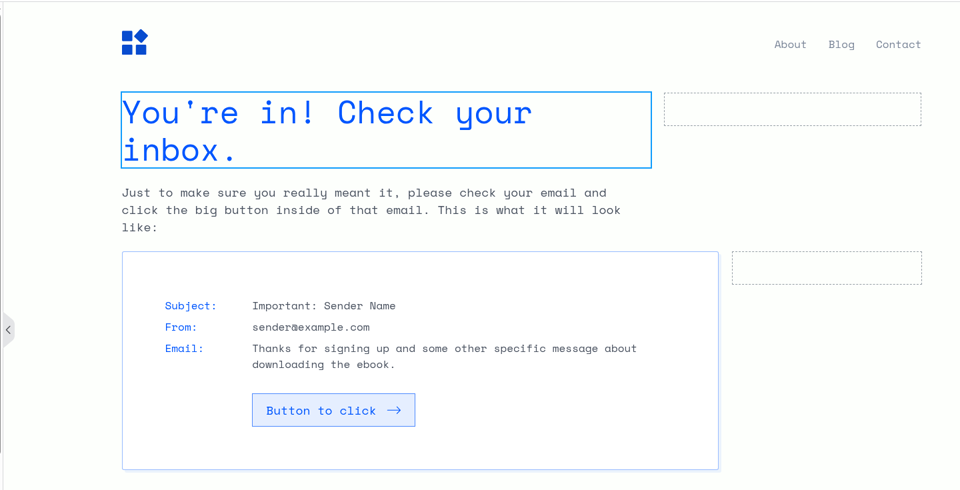
This time we picked the "Thank you!" template and changed the headline to "You're in! Check your inbox." Applying the template, editing the headline and saving took us about a minute.
Before you call it finished, read the rest of the template. It still had a sample email box with "sender@example.com" and "Button to click." Its paragraph also asks readers to check their email and click the button inside, which only makes sense if you turned on double opt-in. Since we didn't, that paragraph needs rewriting before this page is ready for real subscribers.
Step 6: Add the welcome email automation
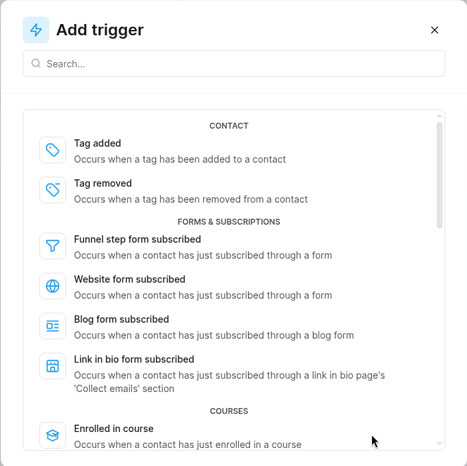
Systeme.io sends automatic emails through automation rules. Open your funnel's "Automation Rules" tab and click "Create." On the rule screen, click "Add trigger" and choose "Funnel step form subscribed" under Forms & Subscriptions. Then click "Add action" to add a tag and send an email, and finish with "Save rule."
The email action is where beginners get stuck. In October, our sender dropdown was empty even though our Gmail address showed as "Verified." Systeme.io only sends from a domain you've authenticated with DNS records. Our custom domain email guide shows every record we added in Squarespace.
We didn't save a rule this time, and the reason is the free plan's biggest catch. Free accounts get one automation rule and one tag. Ours already belong to our first funnel, which tags new subscribers and sends them the welcome email. This demo funnel had nothing left to use.
Step 7: Test it with a real sign-up
Open the live opt-in page in a private browser window and sign up with an address you can check. We used a "+funnel1109" version of our own Gmail address, so it counted as a new contact without needing a second inbox.
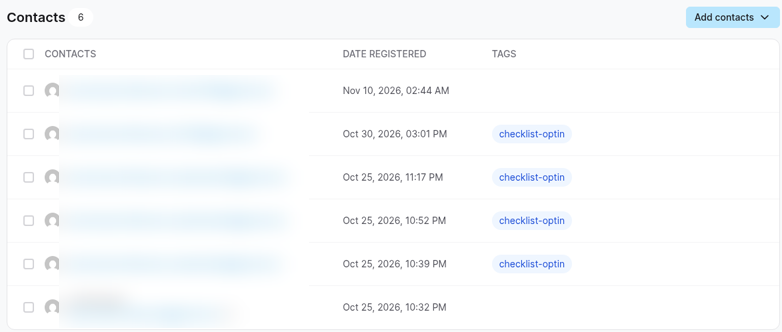
After we clicked "Send Me the Checklist," the thank-you page loaded in about 1.8 seconds. Then we opened CRM, then Contacts. The new contact was already at the top of the list.
Look at the Tags column, though. Every contact from our first funnel says "checklist-optin." The new one has nothing, because this funnel has no rule of its own. Also note the time. The new contact shows "Nov 10, 2026, 02:44 AM," even though we signed up at 8:44 PM Eastern on November 9. Our contact list showed the time in UTC, so don't panic if a test sign-up looks like it arrived tomorrow.
When the free plan stops being enough
It's fine to start free. A single freebie with a single welcome email fits on the free plan, and you can learn the whole builder without paying anything. Our free plan limits post lists everything you get.
Still, our testing gave us two honest reasons to plan on Startup at $17 a month. The first is the one you just saw. Once your one rule tags subscribers and sends a welcome email, a second freebie can't do either. Startup gives you 10 automation rules and 10 tags. The second is the funnel cap. Free allows 3 funnels, and this demo brought us to 2. One more lead magnet fills the last slot, and after that you'd have to delete a funnel to build anything new. Startup raises that to 10 funnels and 5,000 contacts. Yearly billing gives you 2 months free.
Which would you rather do: rebuild your setup in six months, or plan for room to grow now? Build your first funnel on Free. When you're ready for a second freebie, or you want every sign-up tagged by source, that's the time to upgrade to Systeme.io Startup.
Recap
Create the funnel with the "Build an audience" goal, pick a plain template, and edit the headline and button in both desktop and mobile view. Check the redirect and double opt-in settings, finish the thank-you page, and verify a sender on your own domain before you add the welcome email. Then test it yourself and confirm the contact in your list.
Start your free Systeme.io account →
All pricing as of November 9, 2026, from systeme.io/pricing.
Disclosure: Some of the links on this page are affiliate links. This means if you click and make a purchase, we may earn a commission at no extra cost to you. We only recommend tools we have personally tested or thoroughly researched. Our opinions are our own.
